
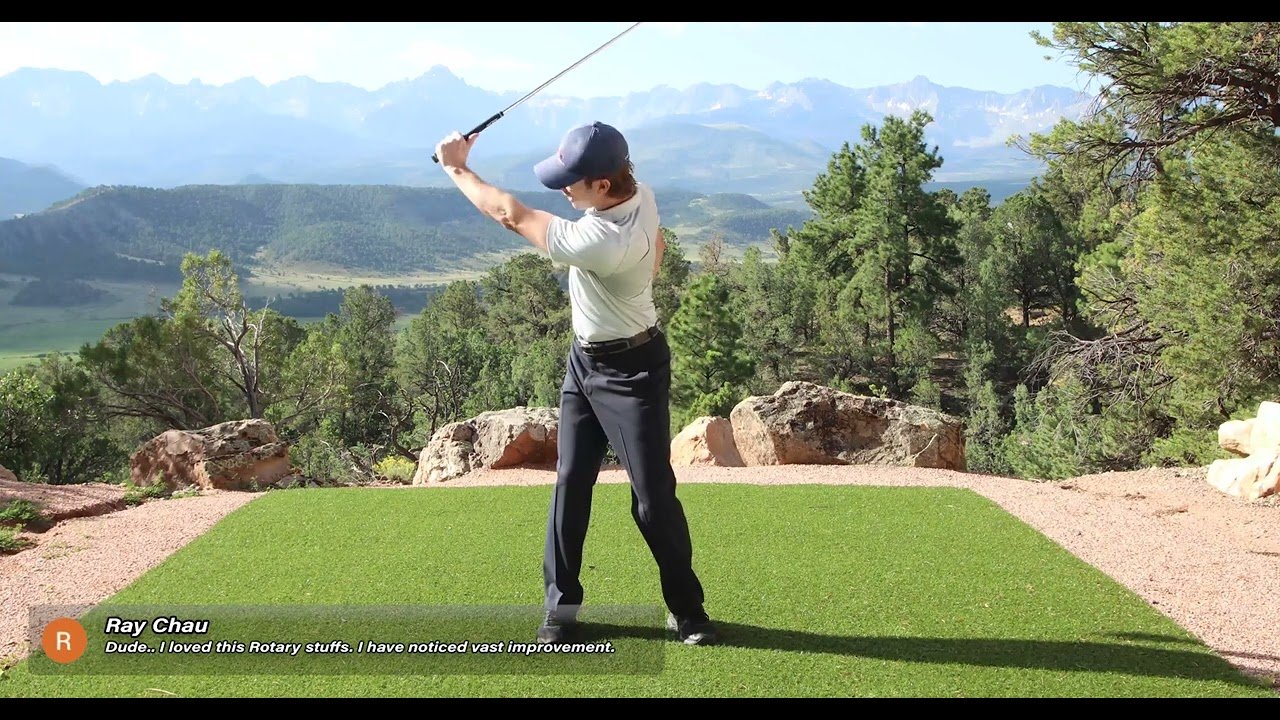
Golf swing improvement: the RotarySwing method in summary
Golf swing improvement doesn’t require collecting another stack of golf tips if you don’t yet have a repeatable movement pattern. In The Simplest Way to Improve Your Golf Swing, Chuck Quinton, founder of RotarySwing.com Golf Instruction, argues that golfers should organize their motion around three linked actions: turn back, transition, and post up.
At 00:00-00:35, Quinton makes a deliberately dramatic case against disconnected golf instruction, books, DVDs, and isolated drills. His useful point is less about throwing away every resource and more about avoiding constant technical switching. According to RotarySwing.com Golf Instruction, a golfer who changes the swing thought every few shots rarely gives one movement enough time to become coordinated.
The video presents an anecdotal result involving RotarySwing member John, who reportedly went from a handicap to four rounds in the 70s within two weeks (00:25-00:55). That is the creator’s claim, not a typical or guaranteed outcome. Your results will depend on setup, golf grip, clubface control, swing path, tempo, physical capacity, and the quality of your golf practice.
Quinton’s three-move model is best treated as a framework. It gives you a practical order for body rotation and weight transfer, but it doesn’t automatically fix every slice, hook, thin shot, or fat shot. The video offers a simpler starting point; your golf swing improvement still requires diagnosis, feedback, and patient repetition in 2026.
TL;DR: the three-move golf swing improvement drill
Here is the practical version of the drill demonstrated around 02:35-04:45. Start without a club so you can feel the sequence before worrying about the clubface or ball flight.
- Turn back: Pull your trail shoulder behind your head while increasing pressure into your trail foot. For a right-handed golfer, that means the right shoulder and right foot.
- Transition: From the top, sit into the lead side without immediately throwing your shoulders open. Let pressure move toward the lead foot while the hips begin to rotate.
- Post up: Straighten the lead leg, open the lead hip, and move roughly 85% of your pressure onto the lead leg. Allow the club to release after the body reaches a stable delivery position.
The intended sequence is simple: the backswing creates rotation, depth, and trail-side pressure; the transition starts pressure moving forward; and the post-up stabilizes the body through impact. As demonstrated in the video, the goal isn’t to manufacture maximum rotation. It is to coordinate the parts in the correct order.
Try this five-minute first test:
- Make unweighted rehearsals of the three moves.
- Add your lead arm and make more repetitions, allowing the arm to rise as the torso turns.
- Make five slow club swings at 25-50% speed.
- After every repetition, check whether you finish balanced and can identify the three phases.
This is a coordination drill, not a forceful speed exercise. If you have to yank the club, spin your shoulders, or strain your back to create the positions, slow down.
Build the setup before changing your golf swing
Before judging your backswing or downswing, check the address position. Golf swing improvement becomes much harder when a poor setup makes a sound movement look faulty. Your golf grip, golf stance, golf posture, golf alignment, and ball position determine the conditions in which the three-move sequence has to operate.
Use a neutral grip as a starting point rather than copying one exact hand style. The lead hand establishes much of the clubface relationship, while the trail hand supports the grip without excessive tension. The most useful test is functional: can the clubface return consistently to the intended target, or does your grip repeatedly produce an open or closed face?
Your stance should feel athletic, with modest knee flex, hips positioned back, balanced feet, and a relatively neutral spine. Align your feet, knees, hips, and shoulders parallel to the intended target line. This connects directly to the video’s emphasis on pressure in the feet at 02:00-02:45. You need enough ground contact to shift pressure without losing balance.
A practical setup routine is:
- Place the clubface behind the ball and aim it first.
- Choose ball position according to club length.
- Build your stance around the club rather than placing your feet first.
- Make one gentle pressure-shift rehearsal.
- Return to address and begin the takeaway.
As a rough starting point, place a mid-iron ball position slightly forward of center, a driver near the inside of your lead heel, and a wedge near center or just back of center. Exact positions vary with equipment, angle of attack, and swing pattern, so use contact and launch data to refine them.

How the backswing creates a repeatable starting point
Quinton describes the backswing in unusually simple terms at 01:55-02:45: pull the right shoulder behind the head and increase pressure into the right foot. For a left-handed golfer, reverse the sides. The cue is intended to move the rib cage and torso, not encourage an independent hand snatch.
Good golf swing mechanics require the body to organize the golf takeaway. As the rib cage rotates, the arms can elevate and the club can move away from the ball without excessive manipulation. This doesn’t mean the hands are passive or frozen. It means they respond to body rotation instead of starting the entire motion on their own.
Quinton turns his head during the demonstration because he explains that a mountain-bike injury left him fused at C1, C2, and C3 (06:30-07:15). That is a personal physical adaptation, not a general instruction. Don’t copy his head movement. Focus on rotating your rib cage and allowing the lead arm to rise naturally.
Use these golf takeaway and backswing checkpoints:
- Pressure feels more concentrated toward the trail foot.
- The torso turns before the arms race away from the body.
- The lead arm rises as the rib cage rotates.
- The club moves away without an abrupt roll of the forearms.
- You remain balanced rather than swaying outside the trail foot.
Film five swings face-on and five down-the-line in slow motion. Keep the camera height, distance, club, and lighting consistent. Compare address, halfway back, and the top of the backswing instead of trusting feel alone. This type of comparison can make golf swing improvement much more measurable.
The transition: pressure shift before aggressive rotation
For many golfers, transition is the most difficult part of the golf swing because the instinct is to start down by throwing the shoulders, arms, or hands from the top. At 02:45-03:35, Quinton identifies this phase as a common source of difficulty and offers a pressure-first alternative.
After turning back, keep the shoulders from immediately turning farther and sit into the lead side. Pressure moves toward the lead foot while the hips begin to rotate. This doesn’t mean freezing the upper body or deliberately holding the shoulders closed for too long. It means giving the lower body and pressure shift a brief opportunity to start the downswing before the upper body aggressively unwinds.
A pressure shift can help the club approach from a more useful inside path, but it cannot repair every clubface problem. Face angle largely influences starting direction, while the relationship between face angle and swing path influences curvature. You may shift pressure correctly and still hit a slice if the clubface remains open.
Practice the transition this way:
- Rehearse the backswing slowly.
- Pause for one second at the top.
- Move pressure into the lead side without throwing the arms.
- Allow the arms to fall as the hips begin to rotate.
- Return to the top and repeat for three sets of repetitions.
Use face-on video to see whether the pelvis begins moving toward the target before the upper body rapidly unwinds. From down the line, check whether the hands remain reasonably in front of your chest rather than being thrown outward. These checkpoints turn a vague golf tip into a usable golf swing improvement process.

Impact position, clubface control, and the post-up
The third move begins after transition. Straighten the lead leg, open the lead hip, and move approximately 85% of your pressure onto the lead side, as Quinton demonstrates at 03:55-04:45. The number is a teaching reference, not a universal measurement for every golfer, club, or shot.
In the delivery position shown around 05:45-06:40, the lead hand is in front of the lead thigh and the shaft is approximately parallel to the ground. The clubface is prepared for a controlled release. For iron shots, many golfers benefit from lead-side pressure and hands slightly ahead of the clubhead, although the precise appearance varies with attack angle and club design.
Separate body motion from clubface control. Body rotation and hip rotation help organize the delivery, but the clubface determines much of the ball’s starting direction. Swing path and face-to-path relationship then influence whether the shot curves left or right. A strong post-up won’t compensate for a face that is dramatically open at impact.
The video’s release instruction is deliberately restrained: once you reach a stable delivery position, let the club release rather than adding a last-second shoulder or hip shove. Check three things in slow motion:
- Pressure has moved primarily to the lead side.
- Your hands are ahead of the clubhead with an iron.
- Your chest and pelvis remain organized while the club accelerates.
Don’t force the post-up by locking the lead knee or violently spinning the hips. The aim is a stable impact position that lets speed travel through the club, not a pose that creates tension.
Why stability matters after impact—and how to practice safely
Quinton’s safety point at 07:00-08:00 is that your body should become stable as the club releases and speed rises. He cautions against continuing to drive the body into excessive rotation and side bend during the fastest part of the swing. A balanced follow-through is a useful sign that the sequence is organized.
The video also references a conversation with medical advisor Dr. Mitch Supler about bulging discs and the potential stress of combining spinal rotation with side bend (07:20-08:15). Treat that discussion as general educational context, not medical advice or a diagnosis. Pain should never be used as proof that a golf swing drill is working.
If mobility, age, injury history, or body type limits your movement, adapt the drill. Shorten the backswing, reduce speed, widen the feet slightly, and rehearse only within a comfortable range. A qualified golf professional can adjust the movement, while a licensed clinician should assess persistent symptoms.
Stop immediately if you experience pain, numbness, radiating symptoms, or loss of balance. Seek professional assessment rather than pushing harder. A safe starting load is 20-30 slow rehearsals followed by only 10-15 half-speed shots. Track strike quality and balance, not just distance or clubhead speed.
This conservative approach supports golf swing improvement because it gives you enough repetition to learn without turning fatigue into poor mechanics. If your motion deteriorates, end the session and return another day.

A beginner-to-advanced golf practice plan
The video gives you a movement framework; a staged practice plan turns it into a measurable skill. This four-stage path helps you avoid jumping from a promising rehearsal straight into full-speed swings.
Stage 1: setup and pressure awareness
Across three sessions, complete unweighted rehearsals, lead-arm rehearsals, and half-swings. Before each repetition, check golf grip, posture, alignment, ball position, and balance. Record whether you can finish without a verbal prompt and whether your pressure ends on the correct side.
Stage 2: body sequence
Rehearse turn back, transition, and post up with no concern for hitting a ball. Use a mirror or slow-motion video. Your target is not speed; it is reproducing the order of the movements at least times out of 10.
Stage 3: arm-and-club integration
Hit three groups of wedge or short-iron shots. Alternate one rehearsal with one shot. Record strike location, starting direction, and whether the finish remains stable. Stop increasing speed if contact becomes random.
Stage 4: speed and on-course transfer
Use random practice with different clubs, targets, and shot shapes. Add your pre-shot routine and judge performance over at least shots rather than one excellent or poor swing. Tempo should remain consistent as speed increases.
Your progress log can include the date, club, drill, repetitions, solid-contact percentage, face-to-target result, and one physical feel. This simple record makes golf swing improvement visible and discourages constant technical changes.
Use video analysis and launch monitor data to diagnose faults
Unstructured golf lessons often fail because the golfer changes technique before identifying the problem. Film face-on and down-the-line swings in slow motion using the same camera height and distance. Compare setup, top, transition, impact, and finish. The video itself demonstrates both camera views around 05:00-07:00.
Use this fault-to-checkpoint table as a starting point:
- Slice: Check face angle first, then determine whether the swing path is out-to-in.
- Hook: Check for a closed face, an in-to-out swing path, or both.
- Thin shot: Inspect early extension, posture loss, and low-point control.
- Fat shot: Check whether pressure remains on the trail side or the body stops moving forward.
Launch monitor numbers become useful when you understand what they describe. Clubhead speed is how fast the clubhead moves; face angle strongly affects starting direction; attack angle shows whether the clubhead is moving upward or downward at impact; and launch angle describes the ball’s initial vertical trajectory.
Don’t change your golf swing because of one shot. Compare at least shots and review three or more data points, such as face angle, swing path, and strike location. A golfer who sees an open face, out-to-in path, and heel strike has a different problem from someone with a neutral face, neutral path, and low-face contact.
Create side-by-side video comparisons with annotations for shoulder turn, hip rotation, pressure shift, delivery position, and follow-through. Use the same club and target so your comparison reflects movement rather than changing conditions. This diagnostic habit is one of the most practical additions to the creator’s golf instruction.

Key takeaways for golf swing improvement in 2026
The central lesson from RotarySwing.com Golf Instruction is to simplify your practice around a repeatable body sequence instead of collecting endless golf tips and isolated golf drills. As the creator explains from 00:00-01:20, a clear movement pattern can reduce decision-making and give your golf swing a consistent starting point.
- Establish a functional golf grip and setup.
- Turn the rib cage into the backswing while pressure moves toward the trail foot.
- Shift pressure into the lead side during transition before aggressively unwinding the upper body.
- Post up through impact with a stable lead side and controlled hip rotation.
- Allow the club to release, then finish in balance.
Golf swing fundamentals still govern the result: clubface control, swing path, ball position, body rotation, weight transfer, tempo, and a stable follow-through. The three moves may make practice easier to organize, but they don’t promise instant ball striking.
Your next action is straightforward: record five face-on and five down-the-line swings this week, complete three sets of rehearsals, and compare contact and launch results before adding another technical change. Measure your process, adapt for your body, and seek individualized feedback when pain or uncertainty appears. That is a more realistic route to lasting golf swing improvement than chasing the next dramatic tip.
https://www.youtube.com/watch?v=hX2BhHiBdXc Summary: key takeaways
Golf swing improvement works best when you can repeat a simple sequence and verify it with contact, video, and launch data. Chuck Quinton’s three-move RotarySwing model gives you a practical structure: turn back, shift into transition, and post up.
- Use setup as the first diagnostic checkpoint.
- Build the backswing through rib-cage rotation and trail-side pressure.
- Start transition with a lead-side pressure shift instead of an abrupt shoulder throw.
- Use the lead leg and hip to stabilize delivery, then release the club.
- Practice slowly, record measurable results, and adapt the motion to your mobility.
Watch the original video for the creator’s demonstrations, then use the practice plan in this article to test the ideas safely over several sessions.

Key Takeaways
- Organize the golf swing around three linked actions: turn back, transition, and post up.
- Check setup, grip, posture, alignment, and ball position before changing swing mechanics.
- Use slow-motion face-on and down-the-line video to diagnose body motion, clubface control, and swing path separately.
- Begin with slow rehearsals and half-swings, then progress through measurable practice stages.
- Adapt the drill for your mobility and stop if you experience pain, numbness, radiating symptoms, or loss of balance.
Frequently Asked Questions
What is the simplest way to improve a golf swing?
The video recommends focusing on three linked movements: turn back, transition into the lead side, and post up through impact. You should also maintain a functional setup so the movement has a reliable starting point.
What are the three movements in the RotarySwing method?
Turn back by rotating the rib cage and increasing pressure into the trail foot. Transition by shifting pressure to the lead side while the hips begin to turn, then post up by straightening the lead leg and opening the lead hip before releasing the club.
Should you keep turning your shoulders through impact?
The creator cautions against forcing continued rotation during the fastest part of the release. Your exact motion will depend on your mobility and swing style, but a stable, balanced body is preferable to an aggressive shove that creates excessive rotation or side bend.
Can this drill fix a slice or hook?
It may improve sequencing, but it doesn’t automatically fix clubface control. Use video or launch monitor data to separate face angle from swing path, then address the variable that actually produces your ball flight.
Can beginners practice the three-move drill?
Yes. Begin without a club, use slow repetitions, and ask a qualified professional to check your grip, stance, posture, alignment, and ball position. Add a club only after you can reproduce the sequence while remaining balanced.
How often should you practice the drill?
Practice for 15-25 minutes three times per week. Use repetition targets and review a weekly video rather than changing your technique after every poor shot.